Saturday, March 24, 2012

Spa Hi Limits


Spa Hi Limit Sensor/Switch

All spas will have a Hi Limit switch or sensor of some sort. This device is a safety device which acts as the thermal protection for your spa. These sensors are designed to prevent the heater element from burning out as well as preventing the spas water from getting too hot. 
Most spa's will not let bathers set the temperature above the manufactures set point (Usually +/-108°F). Hi Limits usually have the high temperature threshold set between 118-121°F. Therefore an error or unusual event must occur leading to the sensor tripping. 
Usually poor water flow. When the water heater's temperature rises too quickly due to insufficient water flow through the heater. Other factors such as damage to the sensor, lose of calibration etc.. can cause issues with Hi Limits. 
Usually the sensor/switch will have failed & these switches do fail once in a while. When they do your spa will cease to function and shut down or default to a maintenance program.

IMPORTANT - This is a safety device! If it is found to be out of calibration, do not attempt to perform a field adjustment! Replace bad hi limit with a new one.


Mechanical Hi Limit

Older style Hi Limit Sensors  feature a red push to reset button. These models are mostly found on spa controls which use air buttons, dial thermostats or are time clock activated. 
If these was an event which wasn't related to equipment failure the hi limit switch can be reset, once reset the spa will function as normal but if it trips again there are other more significant problems with your spa.
Typically these switches have a copper bulb & capillary attached to the main switch body. These Hi Limits are either installed in a dry well or groove tube on/or immediately before the heater.


Digital Hi Limit

Modern digital spas with circuit boards & digital control panels typically have digital/electronic temperature sensors and Hi Limits. Functionally they are the same as the mechanical units, the probes use resistance to measure temperature. Once the maximum/ upper safe temperature limit is reached the sensor will shut the spa down or show an error code on the control panel, 'HL' or 'OH' error codes are the most common but there are others. See our error code post for more information.
These sensors plug directly into the circuit board. Note - there are a variety of plug types and bulb sizes it is important to replace your sensor with the correct one, be sure to match plug type, sensor length, bulb length & diameter.


Other Hi Limit Styles

There are many other types of Hi Limits used in the pool & spa industry. All functionally the same, preventing over heating or injury from water too hot.


Thermodisc (Surface Mount)

Typically found in older Hayward, Hydro-Quip, Raypak, Pentair Purex,  Sundance electric heaters among others.


Pentair gas heater Surface mount Hi Limit


Foam

Typically found in Gecko S & M Class Spa Packs.


Split Nuts?


Need to replace a Pump or Heater union nut? 

Many people have a hard time figuring out how to re-plumb or replace broken pump or heater union nuts.


Heaters:

The heaters flared ends prevent one from taking the nut off of the heater tube. Replacing the whole heater because of a broken nut makes no sense. A split nut is the answer, simply cut/remove the old nut. Clamp either side of the split nut over the heater tube and fasten the screws - new nut! 
How to choose the right size nut?

Heater split nuts come in 3 sizes - 1.5”, 2” & 2.5”
The dimensions of each split nut only refer to the heater tube ID not to any measurement taken from the nut itself or from the OD of the heater tube.
There is some slight variance between companies that make heater split nuts but if one was to measure by the flange (not thread) ID they split nuts should be like this…
  • 1.5” Heater split nut has a flange ID of 1-15/16” thread ID 2-3/8"
  • 2” Heater split nuts have a flange ID of 2-5/16” thread ID 3"
  • 2.5” Heater split nuts have a flange ID of 3-1/16” thread ID 3-5/8"


 Heater Union Split Nut


Pumps:


Usually the reason you'll not be able to remove a solid union nut is the pump tail piece flange prevents removing the nut. 
Until this nut became available the only option was to cut the tail piece off and glue in a new one. With a split nut slide the nut back away from the pump and install the split nut in front. 
Pump union split nuts only come in two sizes, 1.5", 2" & 2.5" 
The dimensions of each split nut only refers to the pump suction or discharge plumbing ID not to any measurements taken from the nut itself or from the OD of pump threads.

  • 1.5” Pump split nut has a flange ID of 2-3/16” thread ID 2.5"
  • 2” Pump split nuts have a flange ID of 2-11/16” thread ID 3"
  • 2.5” Pump split nuts have a flange ID of 3-1/4thread ID 3-5/8"

Pump Union Split Nuts


Saturday, March 10, 2012

Mechanical Spa Thermostats


Spa Thermostats

Many spas have mechanical thermostats.
Unlike digital or electronic thermostats mechanical thermostats utilize a copper sensor bulb attached to the thermostat body with a copper capillary to measure temperature. The body of the thermostat has rotating dial either located either the side or the top of the unit. This dial is used to raise or lower water temperature to a desired level.
Spas with mechanical thermostats are typically older models & replacing the thermostat can be difficult because the part numbers on an older thermostat may not match up with modern replacements options.  We offer a wide selection of thermostats for all makes of spas here.
If one cannot cross reference any part numbers when trying to replace your thermostat it is important to match up 3 key measurements, capillary length, bulb length & diameter. [see below]


Most spa thermostats are Single Pole (SP) rated at 25 amps with temperature range of 70°F-107°F. 

Here are some commonly found thermostats: 

275-1770-00    1/4"x3.4" Bulb, 22" Capillary, DPDT

275-2535-08    1/4" Bulb, 48" Capillary
275-2568-00    1/4"
Bulb, 6" Capillary, w/short leads
275-2568-01    5/16"
Bulb, 6" Capillary, w/short leads

275-2720-00    1/4"x3.5" Bulb, 60"
Capillary  
275-2720-01    5/16" Bulb, 60" Capillary 
 
275-2950-00    5/16"x2.5"
Bulb, 6" Capillary

275-3107-00    12" Capillary
275-3123-00    1/4"x
3.4" Bulb, 12" Capillary, Replacement for Cotherm GTLU0025
275-3123-01    5/16"x3.7" B
, 12" Cap, Replaces Cotherm GTLU0024 & Brett 34-0121A
275-3124-00    1/4"x3.7" B,
36" Cap, Replacement for Cotherm GTLU0031
275-3124-01    5/16"x4" B, 36" Cap

275-3127-01    5/16"x3.4" Bulb, 36" Capillary, Replacement for Cotherm GTLU3010
275-3136-00    5/16"x6"
Bulb, 48" Capillary, Used in Ramco ST-131
275-3142-00    5/16"x2.5"
Bulb, 18" Capillary, Replacement for Cotherm GTLU0034
275-3183-00    5/16"x4"
Bulb, 48" Capillary, Replacement for Cotherm GTLU0026
 
275-3263-00    5/16"x3"
B, 18" Cap, Replaces Hydroquip 3263-00 Cotherm GTLU0016

275-3317-02    5/16" Bulb, 48" Capillary, Found in Patrol & Aquaset
275-3372-00    2.75" - 3.25" Bulbs, Replaces Coates
22002001-55


Thermowell

The sensor bulb is typically inserted into a thermowell, which is a protective fitting that allows the bulb to read the water temperature through the wall of the thermowell with out getting wet. Thermowells come in many shapes and sizes (90° PVC fittings, copper test tube looking fittings & More).
Thermowells are typically found in the foot-well of the spa or somewhere in the suction plumbing between the suction fitting and heater.
The thermowell must never be located after the heater. 
A mechanical Hi limit switch can look like these thermostats & the Hi Limit is attached to the heater - do not confuse the two.

Plumbing PVC Thermowell


Stainless Thermowell


Wall Mount Thermowell


Wednesday, February 29, 2012

How to Measure a Spa Filter Cartridge?


Measuring a Spa Filter cartridge

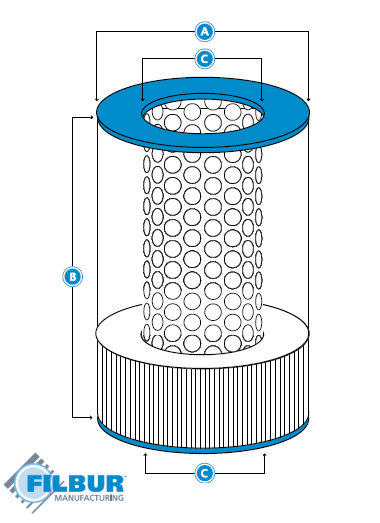
If your filter cartridge does not have any markings or molded part numbers it is possible to take measurements to help us find a replacement.

A. Measure the outside diameter of the cartridge in inches (+/- 1/16")
B. Measure the overall length of the cartridge in inches (+/- 1/16"), including the end caps.
C. If the top and/or bottom is open, measure the inside diameter of the opening (+/- 1/16 inch).
D. Make note of the manufacturer (OEM) and model number of the filter the replacement cartridge will be installed. 

Do not include any handles, strings, etc. 
A more accurate measurement is made by measuring through the center of the cartridge when possible.
Match the cartridge end cap configuration {See below}.


End cap styles


Thursday, February 23, 2012

Spa Heater Element Issues


Spa heater element issues.

What is a heater element? Spa heater elements are comprised of a filament encased in and insulating powder covered by protective skin. The filament of the element is usually a Tungsten coil which functions similarly to a light bulb. Instead of lighting up when current is applied the element resists & heats up. This heats up the coating which is typically Magnesium oxide. The protective skin which can be incoloy, teflon or titanium allows the element to be immersed in water.

GFCI Tripping -

If there are no other components at fault a spa heater element can cause the GFCI to trip.
The GFCI will trip as a result of the heater element short circuiting.
Typically this happens when water infiltrates the heater elements protective outer coating and comes in contact with the heating coil. 
Corrosion is the usual suspect - many years use or chemical damage will cause corrosion. Even a tiny sized hole in the element will lead to a short circuit. Also look for corrosion on the braze, or cracks in the epoxy seal around the terminals. 
When any of these types of corrosion happen, even a pin hole - the element has failed and cannot be repaired it must be replaced.

Low Heat

This problem is not usually associated with the heater element but more often a result of water flow issues. Specifically blockages such as dirty filters, partially closed valves etc...  
But... excessive scale/mineral build up on the element is on uncommon and can result in reduced heating. The fix is easy, use chemical treatments to reduce scale build up.

No Heat

No heat or water is only heating to 60°- 80°? 
If you are getting a low reading this is because the water is only being heated by the friction caused by running through the plumbing system and pump.
Assuming there has not been a dry fire (visual signs of burn/overheat marks/ damage to the heater tube) and your temperature sensor and hi limit are in working order. 
= A bad element.
Like a light bulb, spa heater elements will burn out over time & there are many factors which affect their longevity.

It is possible for a home owner to test an element with an ohm meter, although we advise calling a spa professional for a full diagnostic assessment. 
This test is done assuming that all spa heater/electrical connections & sensors are in good working order. It is best to remove the element from the heater tube. 
If your element is welded to the heater tube your element is not replaceable and are required to replace the complete heater.
Always disconnect the spa from its main electrical supply before attempting test electrical components. Drain the spa or close the gate valves either side of the heater, to ensure no water is left in the heater tube. Remove heater PVC water lines, remove the main power/heater leads from the element terminals, it is easiest to undo the nuts and remove the heater from the tube.

If you have an Ohm meter set it to the lowest setting. Elements working properly will give the following resistance readings (Below) or with in 1 (+/-).
4KW =14Ω
5.5KW = 12Ω
6KW = 9Ω
Too low or infinite readings means the spa heater element is bad.


Spa Parts Shop offers many elements with Titanium coating. Titanium coated elements withstand chemicals (including Salt Chlorinating Systems) better than traditional element coatings. Additionally Titanium coated elements do not contain Iron like most lower end elements & they (Titanium coated heater elements) are also resistant to scale build up.

This information is only intended to inform, not as a how to guide. Please use common sense or enlist the services of a trained spa electrician.

Monday, February 13, 2012

Identifying Spa Jets


Spa OEM's - The companies who assemble the spa you may own generally do not make their own components. Fittings such as jets are bought from suppliers who specialize in manufacturing the fittings and small parts needed to assemble the tub. 

If there are no identifiable markings, part numbers or logos on the jet parts you can try to visually determine which brand you might have. 
The rear of each jet is shown because the front faces are aesthetic and only give an indication to the series the jet belongs to not the brand. 
The rear of the jet is called the diffuser, each brand has their own design which specific to their jet bodies. They are not interchangeable with other brands.


5" Jet Faces

Note - CMP & Waterway Diffusers appear similar, pay close attention when examining your jets.


Pentair Jets


Waterway Jets


Thursday, February 2, 2012

Spa Control Panel Unlock Codes


Most spa controls can be "locked" for protection.
If you accidentally locked your control

Gecko & Hydro-Quip
  • Press & Hold the JET Button for 6 seconds
  • Hold temperature UP & DOWN together for 6 seconds.
  • Four button sequence - Program, Up arrow, Pump 1, Light
 
Balboa
  • 7 button controls, both buttons to the left of the display screen & down temperature.
  • One of the buttons might be stuck in the down position

If these do not help let us know your control make and model & we'll see what we can do to find out more for you.